Progress OpenEdge
Connect Validio to Progress OpenEdge to monitor and validate your operational data.
Progress OpenEdge is an application development platform with an integrated relational database used to build and run business applications. Integrate Validio with your OpenEdge database to monitor, analyze, and validate your data assets.
To integrate with Progress OpenEdge,
- Create a service account in OpenEdge with the appropriate permissions for Validio. See Prerequisites.
- Create a Validio credential to connect to the OpenEdge account. See Add a Progress OpenEdge Credential.
- Create a Validio source to monitor the tables in the OpenEdge database. See Add a Progress OpenEdge Source.
Limitations
Because of constraints in the Progress OpenEdge SQL engine, the following Validio capabilities are not available for OpenEdge sources:
- Percentage-based profiling and sampling — OpenEdge does not support
TABLESAMPLE, so percentage-based table sampling is disabled for OpenEdge sources.- Regex string filters — The Regex operator is not available when building string filters on OpenEdge sources. Other string operators are supported.
- Duplicates Count and Duplicates Percentage validators — Not supported.
- Unique Count and Unique Percentage validators — Not supported.
- Categorical Distribution validator — Not supported (all metric types).
- Numeric Distribution validator with the Relative Entropy metric — The Numeric Distribution validator is available, but the Relative Entropy metric is not. Other Numeric Distribution metrics are supported.
Unsupported validators, metrics, and filter operators appear disabled with a tooltip explaining that they are not supported for the source.
Prerequisites
Create a service account in OpenEdge with read-only access so that Validio can read and validate your data. For more information about credentials in Validio, see Credentials.
Credential Permission Requirements
Validio Credentials require
VIEWERaccess rights when connecting to sources to read and access data. Admins must ensure that they do not provideEDITORaccess rights to their credentials.
Grant the service account:
- Permission to connect to the OpenEdge database.
SELECTaccess on each table and view you want Validio to monitor. OpenEdge has no schema-wide or "all tables"SELECTgrant, so every table and view must be granted individually.
OpenEdge exposes its SQL catalog (SYSPROGRESS.*) to all users by default, so no system-table grants are required — the catalog covers Validio's schema, table, view, and lineage discovery.
The following SQL script provides steps for setting up a user with the necessary permissions for the source in Validio. Run it as a user with database administrator (DBA) privileges:
/*--------------------------------------- Parameters used in this script -------------------------------------------------
Search/replace all instances of these parameters in the script with names of your choice.

validio_user                                      -- Name of the Validio user. Using a new, dedicated user is recommended.
<Some_Password123>                                -- Password for the Validio user.
<schema_to_monitor> [, <schema2_to_monitor>...]   -- Optionally filter access to one or more schemas (owners).

*/------------------------------------------------ Script -----------------------------------------------------

-- A DBA user (e.g. the account used to administer the database) is required to run this setup.

-- Create the Validio user. (Creating the first SQL user also switches the
-- database into enforced-authentication mode.)
CREATE USER 'validio_user', '<Some_Password123>';
COMMIT;

-- No system-table grants are required: OpenEdge exposes the SQL catalog
-- (SYSPROGRESS.*) to all users, which covers Validio's schema/table/view and
-- lineage discovery.

-- Grant read access to the data to validate. OpenEdge has no schema-wide or
-- "all tables" SELECT grant, so each table and view is granted individually.
-- Rather than write them by hand, run the query below to GENERATE the grant
-- statements for every table and view (optionally filtered to specific
-- schemas). Then review the generated statements and run them.
--
-- NOTE: OpenEdge has no "default privileges" mechanism, so these grants apply
-- only to tables and views that exist now. When new tables or views are added
-- that Validio should monitor, re-run this generator and apply the new grants.
SELECT ('GRANT SELECT ON "' || OWNER || '"."' || TBL || '" TO validio_user;') AS stmt
FROM SYSPROGRESS.SYSTABLES
WHERE TBLTYPE IN ('T', 'V')           -- tables and views
  AND OWNER NOT IN ('SYSPROGRESS')    -- exclude the system catalog
--  AND OWNER IN ('<schema_to_monitor>' [, '<schema2_to_monitor>'...])  -- Uncomment to limit to specific schemas
ORDER BY OWNER, TBL;Per-table grants and table listing
OpenEdge has no schema-wide
SELECTgrant and no default-privileges mechanism, so you must grantSELECTon each table and view individually. The generated grants apply only to objects that exist when you run the generator query — when you add new tables or views you want Validio to monitor, re-run the query and apply the new grants.Because all SQL users can list tables in OpenEdge by default, tables may appear in Validio's drop-down menus (for example, in the source creation wizard) even when the user has not been granted
SELECTaccess to them. Granting access as described above ensures Validio can read and validate the tables you select.
Add a Progress OpenEdge Credential
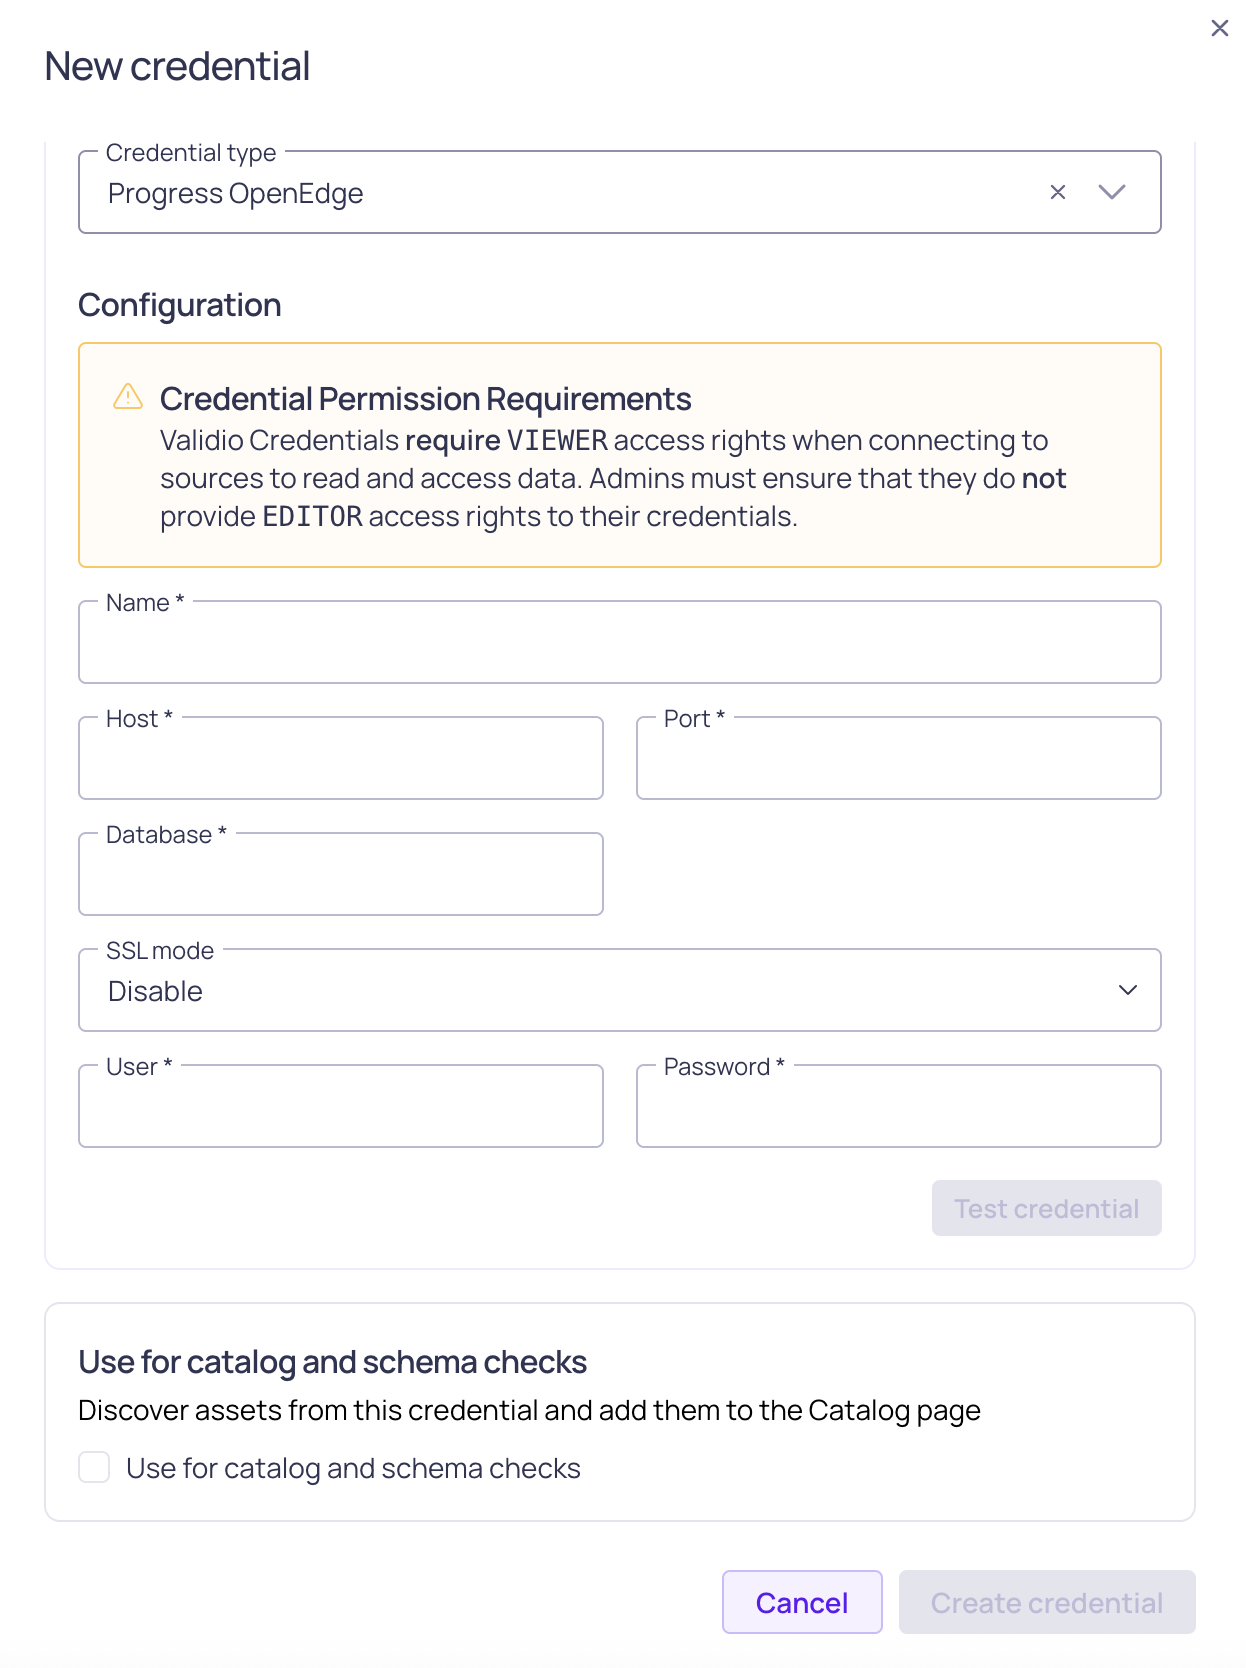
Progress OpenEdge credential configuration
To add a credential for Progress OpenEdge,
- Navigate to Credentials and click + New credential.
- Under Namespace, select a namespace where the resources will be created.
- For Credential Type, select Progress OpenEdge.
- Fill in the credential parameter fields. Refer to the Progress OpenEdge Credential Parameters table.
- (Optional) Click Test credential to validate the connection to the OpenEdge account. If validation fails, check that you provided the correct parameter values and try again.
- (Optional) Check Use for catalog and schema checks to automatically discover assets and add them to the catalog page.
- Click Create credential.
Once the credential is created, you can add a source to monitor OpenEdge data.
Progress OpenEdge Credential Parameters
| Parameter | Description |
|---|---|
| Name | Identifier for the credential, referenced when configuring a source. |
| Host | DNS hostname or IP address of the OpenEdge database server. |
| Port | Port number of the OpenEdge database server. |
| Database | Name of the OpenEdge database to connect to. The database cannot be changed after the credential is created. |
| SSL mode | Select Disable for an unencrypted connection, or Require to encrypt the connection between Validio and the OpenEdge server with TLS. |
| User | Username of the OpenEdge account with read access to the desired tables. |
| Password | Password of the specified OpenEdge account. |
| TLS CA certificate | (Optional, SSL mode Require) Paste or upload the CA certificate used to verify the server certificate. |
| Certificate name | (Optional, SSL mode Require) Expected Common Name or Subject Alternative Name on the server certificate. Set this when it does not match the host you connect to. |
Add a Progress OpenEdge Source
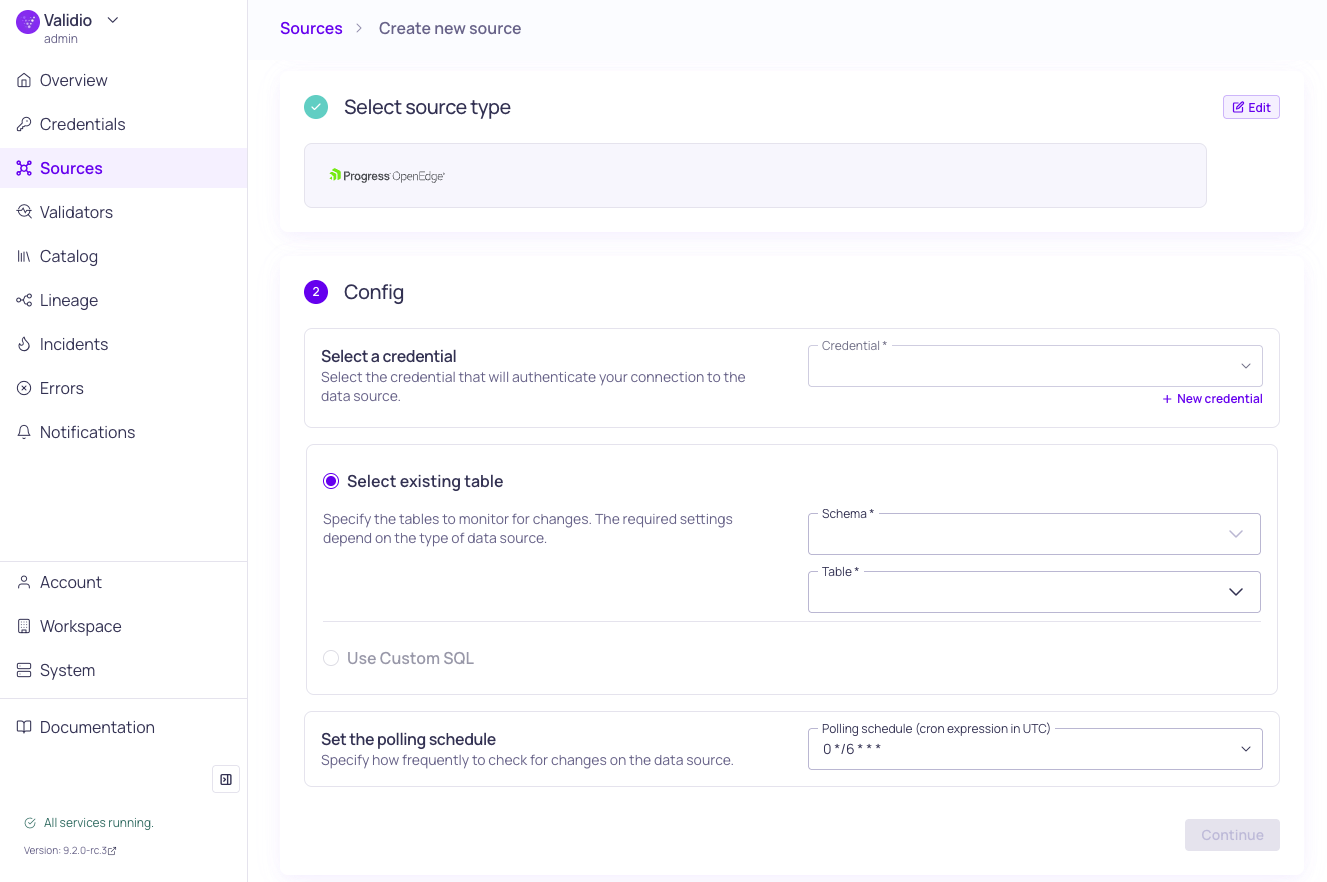
Progress OpenEdge source configuration
To add a source for Progress OpenEdge,
- Navigate to Sources and click + New source.
- Under Source type, select Progress OpenEdge.
- Under Config,
- Select the valid Credential or create a new credential to authenticate your connection to the database.
- You have two options for specifying the dataset and tables to monitor:
- Select an existing table — Enter the Schema and Table to specify where the data comes from. Selecting more than one table will create a new source for each table. Refer to the Source Configuration Parameters table.
- Use Custom SQL — Write a valid SQL query to specify the data to monitor. See Custom SQL Sources.
- Set the Polling schedule, which is how frequently the validators on the source will check for changes.
- Under Schema, click Continue to automatically infer the schema fields from the tables you selected. If you select many tables, this operation can take a few minutes to complete.
- Under Source details,
- Add Tags to help group related sources or to use for routing notifications.
- Add an Owner who will be the contact for incident notifications.
- Assign a Priority, which indicates the importance of incidents detected on this source.
- Click Continue to create the source.
Source names are generated automatically and will be displayed when the source creation completes. If there are more than 5 sources, you will see the names for the first five and a count of the remaining sources.
Progress OpenEdge Source Configuration Parameters
| Parameter | Description |
|---|---|
| Credential | Progress OpenEdge credential. |
| Schema | Name of the schema that contains the table. |
| Table | Name of the table to read data from. |
Updated 20 days ago