Oracle
Connect Validio to Oracle Database to monitor and validate your operational data.
Oracle Database is a multi-model database management system commonly used for running online transaction processing, data warehousing, and mixed database workloads. Oracle uses SQL for database updating and retrieval. Integrate Validio with your Oracle database to monitor, analyze, and validate your data assets.
To integrate with Oracle,
- Create a service account in Oracle with the appropriate permissions for Validio. See Prerequisites.
- Create a Validio credential to connect to the service account. See Add an Oracle Credential.
- Create a Validio source to monitor the tables in the Oracle database. See Add an Oracle Source.
Prerequisites
Create a service account in Oracle with the appropriate permissions for Validio to read and validate your data. For more information about credentials in Validio, see Credentials.
Credential Permission Requirements
Validio Credentials require
VIEWERaccess rights when connecting to sources to read and access data. Admins must ensure that they do not provideEDITORaccess rights to their credentials.
The following SQL script provides steps for setting up a user with the necessary permissions for the source in Validio. Copy the script into a SQL worksheet and follow the steps:
-- Create a user.
CREATE USER VALIDIO_USER IDENTIFIED BY <password>;
GRANT CREATE SESSION TO VALIDIO_USER;

-- Grant read access to the following system tables
-- These permissions are required for Validio catalog functionality.
GRANT SELECT ON "SYS"."V_$SERVICES" TO VALIDIO_USER;
GRANT SELECT ON "SYS"."V_$SQL" TO VALIDIO_USER;
GRANT SELECT ON "SYS"."DBA_USERS" TO VALIDIO_USER;
GRANT SELECT ON "SYS"."ALL_USERS" TO VALIDIO_USER;
GRANT SELECT ON "SYS"."ALL_OBJECTS" TO VALIDIO_USER;
GRANT SELECT ON "SYS"."ALL_TAB_COLUMNS" TO VALIDIO_USER;
GRANT SELECT ON "SYS"."ALL_TAB_COMMENTS" TO VALIDIO_USER;
GRANT SELECT ON "SYS"."ALL_COL_COMMENTS" TO VALIDIO_USER;

-- For data monitoring and profiling, grant read access to all relevant tables and views.
-- The following grants read access to all existing and future tables and views.
GRANT SELECT ANY TABLE TO VALIDIO_USER;
/*
The following variants may be used to grant read access to specific tables and views.

-- Grant read access to an individual table/view.
GRANT SELECT ON <myschema>.<mytable> TO VALIDIO_USER;

-- Grant read access to all existing and future tables/views within a schema.
-- Oracle 23c and above.
GRANT SELECT ANY TABLE ON SCHEMA <myschema> TO VALIDIO_USER;
*/
Add an Oracle Credential
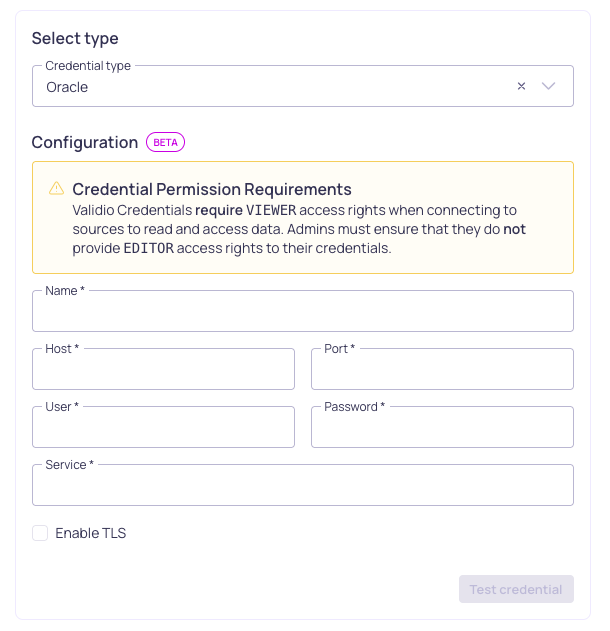
Configuration for an Oracle credential
To add a credential for Oracle,
- Navigate to Credentials and click + New credential.
- Under Namespace, select a namespace where the resources will be created.
- For Credential Type, select Oracle Credential.
- Fill in the credential parameter fields. Refer to the Oracle Credential Parameters table.
- Check Use for catalog and schema checks to automatically discover credentials and add them to the catalog page.
- Click Create.
Validio will validate the connection to the Oracle account. If validation passes, Validio will automatically start fetching data. If validation fails, check that you provided the correct parameter values and try again.
Once the credential is created, you can add a source to monitor Oracle data.
Oracle Credential Parameters
| Parameter | Description |
|---|---|
| Name | Identifier for the credential, referenced when configuring a source. |
| Host | DNS hostname or IP address to the Oracle database server. |
| Port | Port number of the Oracle database server. |
| User | Username of the Oracle account with read access to the desired table. |
| Password | Password of the specified Oracle account. |
| Service | Name of the Oracle service to connect to. |
| Enable TLS | (Optional) Check to enable encryption between Validio and the Oracle server. |
| PEM certificate bundle | When TLS is enabled, paste or upload a PEM certificate file. |
Add an Oracle Source
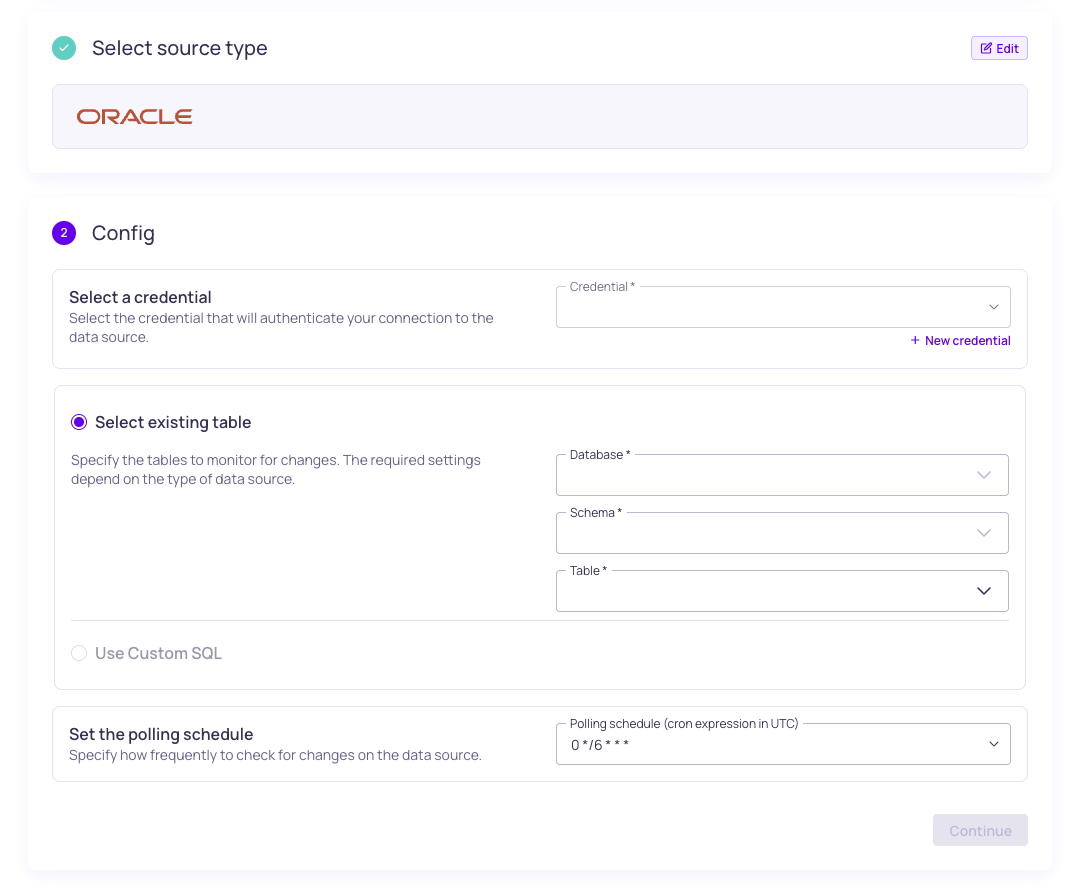
Configuration for an Oracle source
To add a source for Oracle,
- Navigate to Sources and click + New source.
- Under Source type, select Oracle.
- Under Config,
- Select the valid Credential or create a new credential to authenticate your connection to the data warehouse.
- You have two options for specifying the dataset and tables to monitor:
- Select an existing table -- Enter the Database, Schema, and Table to specify where the data comes from. Selecting more than one table will create a new source for each table. Refer to the Source Configuration Parameters table.
- Use Custom SQL -- Write a valid SQL query to specify the tables to monitor.
- Set the Polling schedule, which is how frequently the validators on the source will check for changes.
- Under Schema, click Continue to automatically infer the schema fields from the tables you selected. If you select many tables, this operation can take a few minutes to complete.
- Under Source details,
- Add Tags to help group related sources or to use for routing notifications.
- Add an Owner who will be the contact for incident notifications.
- Assign a Priority, which indicates the importance of incidents detected on this source.
- Click Continue to create the source.
Source names are generated automatically and will be displayed when the source creation completes. If there are more than 5 sources, you will see the names for the first five and a count of the remaining sources.
Oracle Source Configuration Parameters
| Parameter | Description |
|---|---|
| Credential | Oracle credential. |
| Database | Name of the Oracle database. |
| Schema | Name of the schema that contains the table. |
| Table | Name of the table to read data from. |
Updated 12 days ago