Send Validio notification messages as emails with rich HTML content.
The Email integration lets Validio send notification messages from your SMTP server. You create the SMTP connection once as an integration, then create one or more channels that add the sender and recipient addresses for specific notification flows.
Prerequisites for Email Notifications
The Email integration requires the connection details for your SMTP server or service:
- SMTP server address and port.
- Encryption type (None, StartTLS, or SSL/TLS).
- (Optional) Username and password for authenticated sending.
- A valid sender email address.
- One or more recipient email addresses.
Create an Email Integration
- In Validio, navigate to Workspace > Integrations and click + New integration.
- From the Integration type list, select Email.
- Enter a Name for the integration, for example "Corporate SMTP".
- Under SMTP server, enter the SMTP address and Port.
- Under Encryption, choose the connection security type. The dropdown defaults to None.
- None — messages are sent in plain text.
- StartTLS or SSL/TLS — the form reveals a TLS CA certificate upload field. Provide a certificate if your SMTP server requires a custom certificate chain.
- (Optional) Enter a Username and Password for the email account.
- (Optional) Enable Interactive messages to include interactive elements in sent emails.
- (Optional) Click Test integration to verify that Validio can connect to the SMTP server.
- Click Create integration.
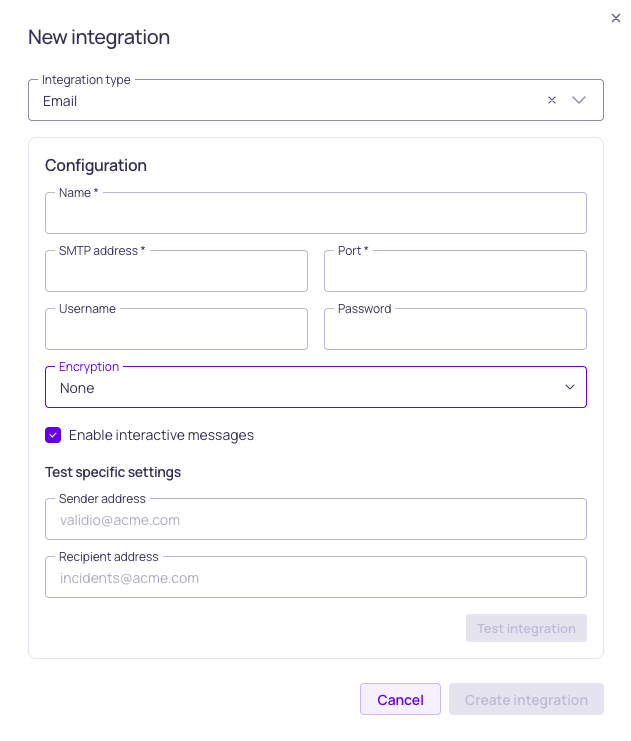
Email integration form
Create a Notification Channel for Email
- In Validio, navigate to Notifications > Channels and click + New channel.
- Under Integration, select the Email integration you created.
- Enter a Name for the channel.
- Enter the Sender address that will appear in the
Fromfield of outgoing emails. - Enter one or more Recipient addresses that will receive notifications from this channel. Type each address and press Enter or comma to add it as a tag. Entries that do not match the email pattern are rejected.
- Select the Namespace where the channel will be created.
- Click Create.
Email Configuration Parameters
| Parameter | Description |
|---|---|
| Integration (channel) | Select an existing Email integration. If none exists, create one first at Workspace > Integrations. |
| Name (channel) | Display name for the email channel. |
| SMTP address (integration) | IP or DNS address of the SMTP server, for example smtp-relay.my-company.com. |
| Port (integration) | Port number where the SMTP server runs, for example 465. |
| Encryption (integration) | Choose the encryption type. Defaults to None. • None — Messages are sent in plain text. • StartTLS — The connection uses the SMTP StartTLS command to negotiate a TLS connection. • SSL/TLS — The connection uses TLS for message encryption. When StartTLS or SSL/TLS is selected, the form reveals an optional TLS CA certificate field for SMTP servers that require a custom certificate chain. |
| Username (integration) | (Optional) Identifier for the user account used to log into the SMTP server. Depending on the SMTP provider, this value may be an API token or an email address. |
| Password (integration) | (Optional) Password for the specified user account. |
| Sender address (channel) | Email address used in the From field of outgoing messages. |
| Recipient addresses (channel) | One or more addresses used in the To field of outgoing messages. Type each address and press Enter or comma to add it as a tag. Entries that do not match the email pattern are rejected. |
| Interactive messages (integration) | If enabled, interactive elements such as images are included in the sent email messages. Otherwise, emails contain only text. |
After creating the channel, add notification rules on the channel's details page to control which incidents generate emails.
Email Notification
When a notification rule on the Email channel triggers, an email is sent to the configured recipient addresses. Incident notifications include the incident priority in the message body. Email notifications do not include the source owner.
Updated about 2 months ago