Searching, Filtering, and Saving Views
Learn how to search, filter, and sort resource lists across Validio, which filters each page offers, and how to save your setup as a reusable view.
Most list pages in Validio — including Sources, Validators, Incidents, and the Catalog — share the same search, filter, and sort toolbar above the resource table. When you are managing high volumes of data, these tools let you isolate the specific resources you need. You can then save a search, filter, and sort combination as a reusable View.
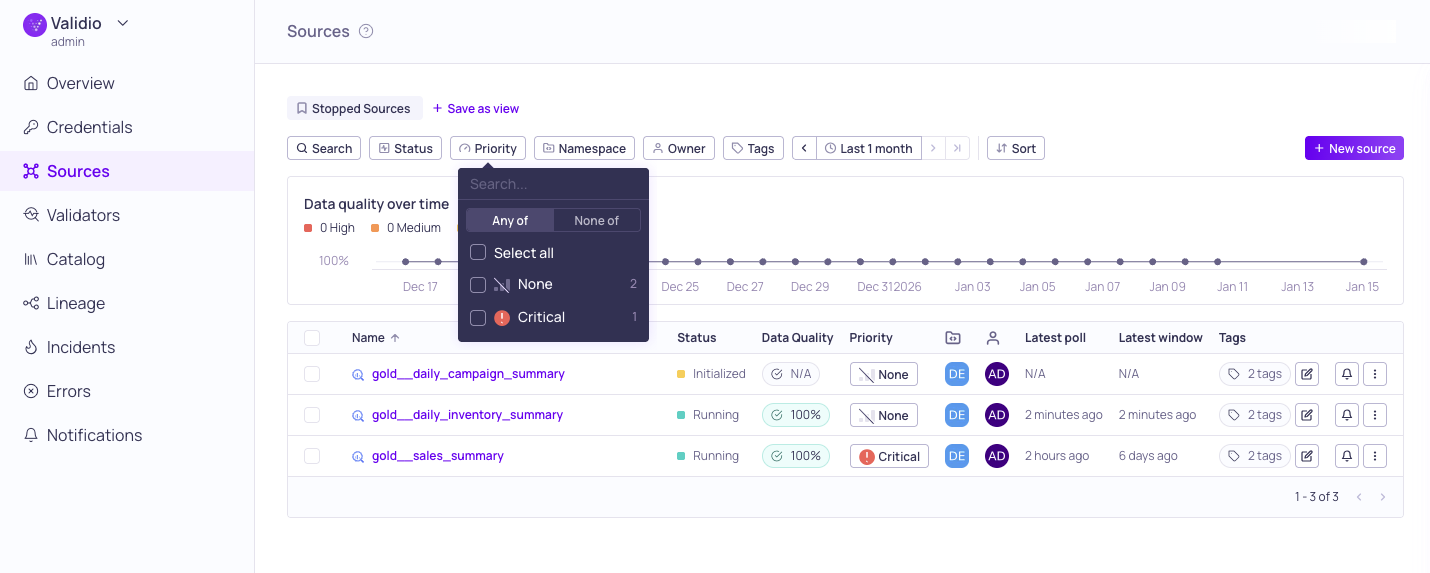
Search and filtering options on the Sources page
Searching
The search box matches keywords against the resource Name (and, on some pages, the description and aliases). Searching is not case sensitive, and the list updates as you type. When you enter more than one keyword, the results include resources that match any of the keywords, ranked by relevance.
Not every page has a search box — for example, the Incidents page is filtered rather than searched. See Filters available by page.
Filtering
Filter options are context-specific and adapt to the page you are viewing. For example:
- On the Sources page, the Status filter tracks operational status, such as whether a source is Running, Idle, or Backfilling.
- On the Incidents page, the Status filter reflects the stages of your troubleshooting workflow: Triage, Investigating, Resolved, and False positive.
When you open a filter, Validio shows a count of the resources that match each value.
Filter Operators
Filters support both inclusive and exclusive logic using Any of, All of, or None of operators. For example, to view all Sources except those currently Idle, you can use either of the following configurations:
- None of: Select Idle to exclude it from your view.
- Any of: Select all of the other states (Running, Backfilling, and so on).
Most filters support Any of (the default) and None of. The All of operator — which returns only resources that match every selected value — is available on Tags, Classifications, and Glossary terms. For example, selecting two tags with All of shows only resources that have both tags.
Many filters also offer an empty option, such as No owner, No tags, or No priority, so you can find resources that have no value set for that field.
Filters Available by Page
The filters, search, and saved-view support differ by page. The following table summarizes what each list page offers.
| Page | Search | Filters | Saved views |
|---|---|---|---|
| Sources | Name | Status, Priority, Namespace, Owner, Tags, Time range | Yes |
| Validators (global) | Name | Type, Source, Namespace, Owner, Tags, Dimension, Data quality fields, Time range | Yes |
| Validators (source tab) | Name | Type, Owner, Tags, Dimension, Data quality fields, Time range | Yes |
| Incidents | — | Priority, Status, Owner, Source, Namespace, Validator type, Tags, Segmentation, Segment value, Time range | Yes |
| Catalog assets | Name, Description | Type, Location, Glossary, Domain, Tags | Yes |
| Glossary terms | Name, Description, Aliases | Domain, Classification, Owner | No |
| Classifications | Name, Description | Type, Regulator, Owner, Dimension | No |
| Credentials | — | Type, Namespace | No |
| Channels (Notifications) | — | Namespace | No |
| Lineage graph | Node names | Glossary term, Domain, Tag, Type, Location, Source | Yes |
If a filter has no values to select on the current page, it does not appear. Some pages document their filters in more detail — see Incidents, Catalog assets, and Validators.
Sorting
Use the Sort menu to order the table by a field such as Name, Created date, or Last updated time. The available sort fields vary by page. Selecting a field a second time toggles between ascending and descending order.
For faster navigation, you can click the Name column header directly in the table to sort alphabetically or reverse-alphabetically.
Clearing Filters
To reset the view, click Clear. This option becomes available once you have applied any search, filter, or sort customization.
Saving Views
A saved view captures your current search, filters, sort, and time range so you can return to a setup instantly or share it with your team. For example, you can create a view titled "My Incidents" that filters for critical incidents assigned to you within the last 24 hours, then use it in your daily triage workflow. To share a specific state without saving a view, copy a deep link instead.
Saved views are available on the Sources, Validators, Incidents, Catalog assets, and Lineage pages. The Glossary, Classifications, Credentials, and Channels pages do not currently support saved views.
Create a Saved View
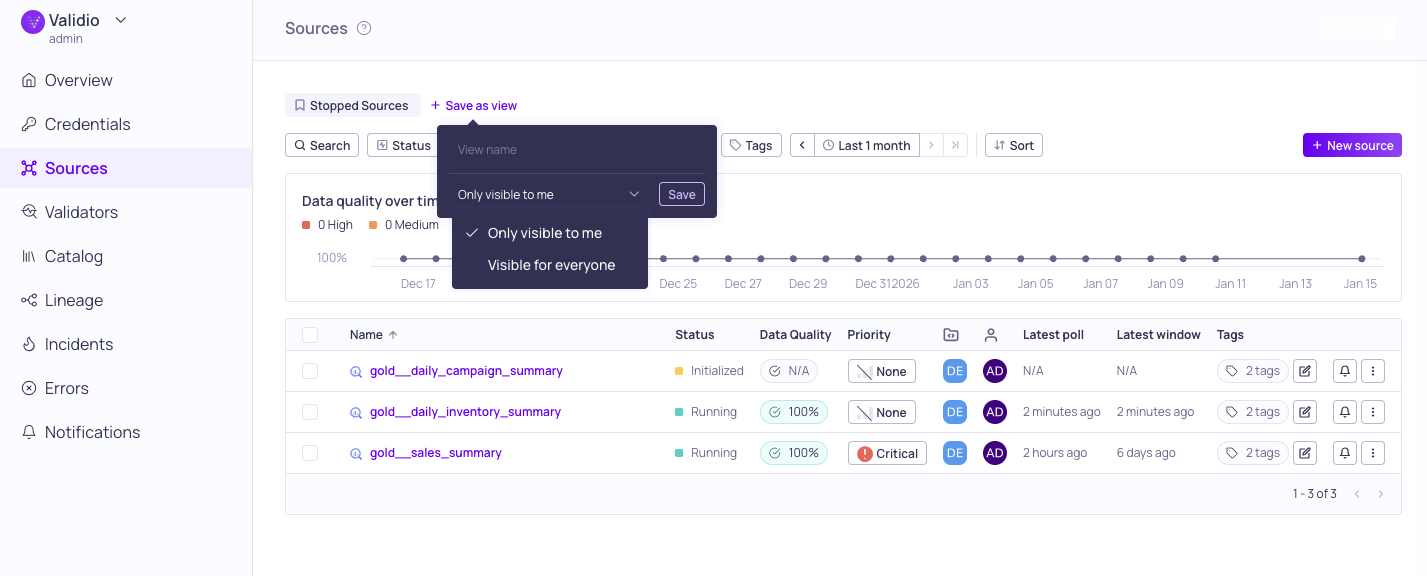
Configuration options for saving a view
Saved views are listed as buttons above the search bar, filter options, and sort menu. If there are none, you will see "No saved views".
To create a saved view,
- Apply your search, sorting, or filters to the page.
- Click + Save as view.
- Name: Enter a unique and descriptive name.
- Visibility: Keep your view private (Only visible to me) or share it with everyone (Visible to everyone).
- Click Save.
Update a Saved View
If you apply more filters to a saved view, the Save as view button becomes Update view.
To update the current view,
- Click Update view.
- (Optional) Edit the Name and Visibility of the view.
- Click Update to save your changes.
To avoid overwriting the current view, open the Update view menu and choose Save as new view instead.
Delete a Saved View
To remove a saved view,
- Hover over or select the view name.
- Click the trash can icon to delete the view.
Updated 15 days ago