Microsoft Teams
Send Validio notifications to a designated Microsoft Teams channel.
The Microsoft Teams integration sends Validio notification messages to a designated Microsoft Teams channel, letting your team receive alerts when data quality incidents are detected.
In Validio, you configure Microsoft Teams in two steps: create a Teams integration that holds the bot credentials, then create one or more channels that route alerts to specific Teams channels.
Prerequisites for Adding a Microsoft Teams Integration
To send Validio notifications to designated channels in Microsoft Teams, you must first:
- Create an app in Microsoft Teams for Validio.
- Configure a bot in your Microsoft Teams app with the necessary permission scopes to communicate with your Validio installation.
- Publish the app to the relevant channels where you want to route incident notifications from Validio.
You can find step-by-step instructions for creating and configuring the Microsoft Teams app in Setting up a Microsoft Teams App for Validio.
After completing the Teams app setup you should have:
- A Bot ID (Client ID) for the Validio bot.
- A Client secret for the bot.
- (Single-tenant apps only) A Tenant ID.
- The Teams channel ID of each channel you plan to notify.
Create a Microsoft Teams Integration
- In Validio, navigate to Workspace > Integrations and click + New integration.
- From the Integration type list, select Microsoft Teams.
- Enter a Name for the integration, for example "Validio Teams Bot".
- Enter the Client ID and Client secret from your Teams app.
- (Single-tenant apps only) Enter the Tenant ID.
- (Optional) Enable Interactive messages so users can manage incidents directly from Teams.
- (Optional) Click Test integration to verify the connection.
- Click Create integration.
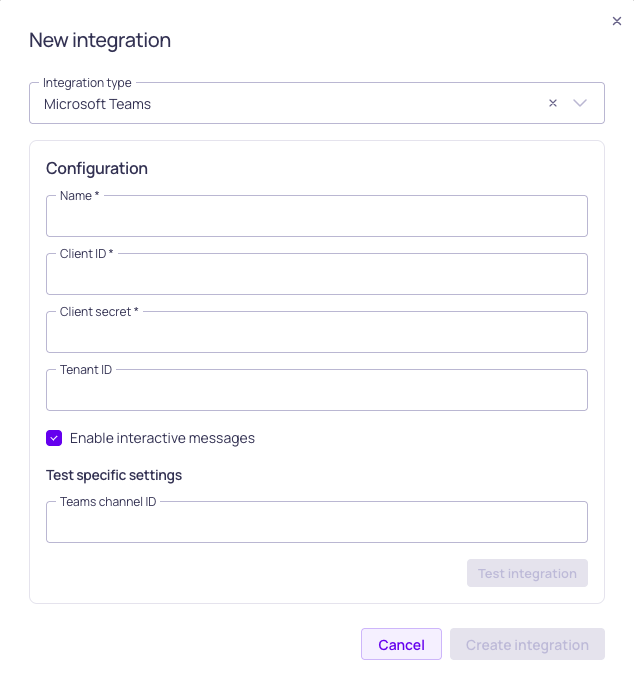
Microsoft Teams integration configuration
Create a Notification Channel for Microsoft Teams
- In Validio, navigate to Notifications > Channels and click + New channel.
- Under Integration, select the Microsoft Teams integration you created.
- Enter a Name for the channel.
- Enter the Teams channel ID of the destination channel in your Microsoft Teams tenant.
- Select the Namespace where the channel will be created. Only users assigned to the same namespace can access this channel.
- Click Create.
Microsoft Teams Channel Configuration Parameters
| Field | Description |
|---|---|
| Integration | Select an existing Microsoft Teams integration. If none exists, create one first at Workspace > Integrations. |
| Name | Identifier for this Validio channel, used to label it in the channels list. |
| Teams channel ID | The ID of the Microsoft Teams channel where messages should be posted. To find this ID, go to the Teams channel and click "copy link". The relevant part of the link is after channel/ and before the next /, for example: ...channel/CHANNEL-ID/. Do not include the slashes around CHANNEL-ID. |
| Namespace | Namespace where the channel will be created. Only users assigned to the same namespace can access this channel. |
Configure the Notifications Content
After adding the Microsoft Teams channel, add notification rules on the channel's details page to specify which incidents should be sent.
Notifications on Backfilled Validators
Validio does not send notifications for incidents when backfilling validators.
Microsoft Teams Notification
When a notification rule on the Microsoft Teams channel triggers, a message is posted to the configured Teams channel. Incident notifications show the source owner and incident priority in the message body, so on-call engineers can route the alert without opening Validio.
Troubleshooting
The following are troubleshooting tips for some common errors when configuring notifications to Microsoft Teams.
Error: "The bot is not part of the conversation roster."
- Cause: The app has not been added to the channel in Microsoft Teams.
- Solution: Add the app to the channel in Microsoft Teams before attempting to use it.
Error: "Authorization has been denied for this request."
- Cause: Tenant ID configuration mismatch.
- Solution:
- If you entered a tenant ID, remove it. (The bot is likely configured as a multi-tenant bot.)
- If you did not enter a tenant ID, add your tenant ID to the integration configuration.
Error: "The client application <client-id> is missing service principal in the tenant."
- Cause: The service principal has not been created for your bot in Azure AD.
- Solution: Create a service principal,
- Navigate to the App registrations page in the Azure portal.
- Locate your bot app.
- Click "Create Service Principal".
Updated about 2 months ago