Managing Validators
Update, rerun, reset, mute, duplicate, and delete validators from the global Validators page, Source Validators tab, or the Validator details page.
You can manage validators from the global Validators page, the Validators tab on the Source details page, or the individual Validator details page. For an overview of these pages and what information they display, see Reviewing Validators. For information about creating new validators, see Configuring a Validator.
Actions Available by Page
The following table summarizes which management actions are available on each page.
- On the global Validators page and the Source Validators tab, actions are accessed from the ⋮ menu on each validator row.
- On the Validator details page, actions are accessed from the controls and ⋮ menu at the top of the page.
- On the validator information panel, actions like owner, priority, tags, and description are available inline. See Validator Information Panel.
| Action | Global Validators Page | Source Validators Tab | Validator Details Page | Validator Panel |
|---|---|---|---|---|
| Update configuration | ✓ (limited) | ✓ | ✓ | |
| Update threshold | ✓ | |||
| Assign owner | ✓ | ✓ | ||
| Update priority | ✓ | ✓ | ✓ | |
| Add tags | ✓ | ✓ | ✓ | ✓ |
| Update description | ✓ | ✓ | ||
| Set dimension and fields | ✓ | ✓ | ✓ | |
| Mute | ✓ | ✓ | ||
| Duplicate | ✓ | ✓ | ||
| Rerun | ✓ | ✓ | ✓ | |
| Reset | ✓ | ✓ | ✓ | |
| Delete | ✓ | ✓ | ||
| Manage incidents | ✓ |
Validator Management Actions
Updating a Validator
You can update a validator's configuration, including the display name, description, and filters. On the global Validators page, updating is limited to the display name, description, and filters. On the Source Validators tab and Validator details page, click the ⋮ menu and select Update to edit the full validator configuration.
Updating Thresholds
On the Validator details page (Metric tab), click Update threshold to modify the threshold settings on the validator. This option is not available on the Overview tab. For more information, see Updating Threshold Settings.
Assigning an Owner
On the Validator details page, you can assign or update the Owner of the validator. By default, the owner is set to the creator of the validator, and all incidents detected will inherit the same owner.
Updating the Priority
The Priority helps you and other users understand the importance of any issues or incidents that are detected on a source or validator. The priority can be None, Low, Medium, High, or Critical.
- Validator priorities will override the source priority. Incidents detected on the validator will inherit the priority that is assigned to the validator.
- If the validator does not have a priority the incident will inherit the source priority. (You cannot change the priority on an incident or incident group.)
You set the priority during configuration, but you can update it from the Source Validators tab or the Validator details page by clicking the priority value and selecting a new one from the list.
Adding Tags
Add tags to a validator to help categorize and filter validators across your workspace. Tags can be added from the global Validators page, the Source Validators tab, the Validator details page, or the validator information panel.
Updating Descriptions
You can add or edit a description on the Validator details page or in the validator information panel. Descriptions support markdown formatting and can be used to document the purpose, configuration, or expected behavior of a validator.
You can also generate descriptions using AI. Click the AI generate button (sparkle icon) in the description area to produce a description based on the validator's type, configuration, source context, and monitored fields. For more information, see AI Description Generation.
Setting Data Quality Dimension and Fields
You can tag a validator with a data quality dimension (e.g., Completeness, Validity, Timeliness) and a list of data quality fields that the validator is intended to govern. These tags drive coverage rollups across the catalog — on glossary terms, classifications, and the schema fields list.
Both are set during validator creation in the Details step of the wizard. To change them on an existing validator, open the validator update dialog or the validator information panel and edit the Dimension and Data quality fields controls. Either can be left unset.
For details on the six dimensions and how field coverage rolls up, see Data Quality Dimensions.
Muting a Validator
You can mute a validator to silence notifications for a specified time period. For more information, see Muting Incident Notifications.
Duplicating a Validator
You can duplicate a validator to create a copy with the same configuration. Click the ⋮ menu and select Duplicate.
Rerunning a Validator
Rerunning a validator re-executes the validation on the most recent window (or a specific window when triggered from the metric graph) while preserving all existing metric data, incidents, and audit history. This is a non-destructive action designed for verifying data fixes after remediation, particularly in regulated industries where a complete audit trail is required.
When a rerun completes, the new metric value is stored alongside the original value. You can view the rerun history in the metric graph tooltip and in the Rerun value and Rerun at columns in the incidents list. If the rerun value falls within the configured bounds, the incident is automatically resolved.
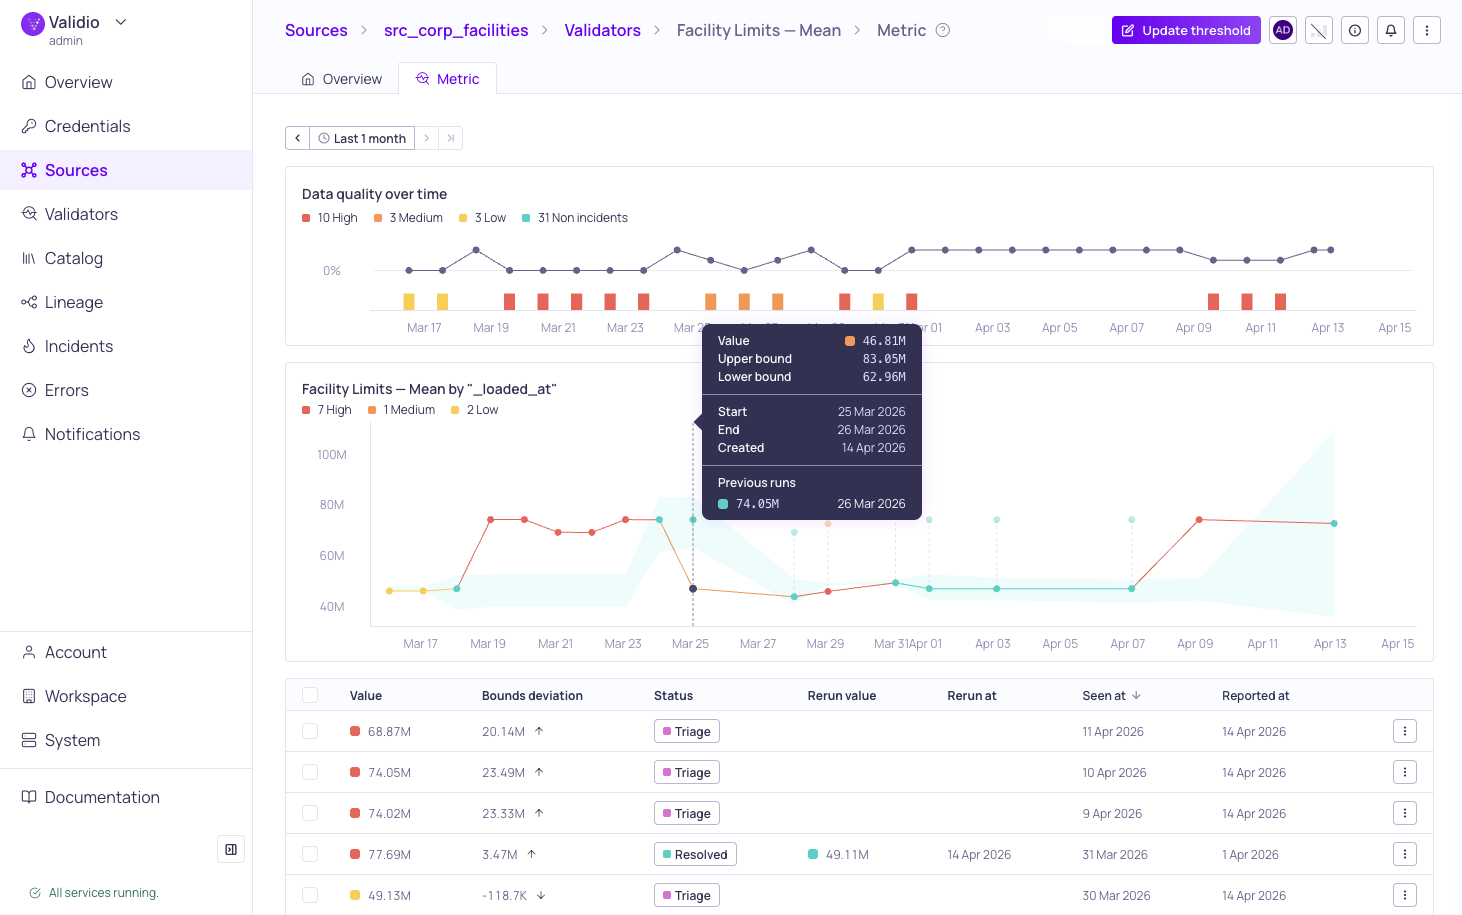
Metric graph and incidents list after a rerun completes
Rerunning is available from the ⋮ menu on the global Validators page, the Source Validators tab, and the Validator details page. On the Validator details page, you can also trigger a rerun from a specific time window by clicking a datapoint on the metric graph and selecting Rerun from {date} in the sticky tooltip.
When rerunning from the ⋮ menu, a confirmation dialog gives you the option to Include related validators — validators that share the same pipeline configuration. This is useful when a data fix at the source affects multiple validators.
Rerunning requires both
validators:WRITEandincidents:WRITEpermissions because a rerun can change the status of an incident.
Rerunning is not available for the following validator types:
- Freshness validators
- Reconciliation validators
- Validators with a Global Window
- Validators with metadata enabled
If you need to fully recalculate metrics and retrain thresholds from scratch, see Resetting a Validator instead.
Resetting a Validator
Resetting a validator deletes all existing metric data and incidents from the selected validators and places them into a pending backfill mode. This granular approach allows you to trigger targeted backfills and update thresholds without the risk of disrupting your existing integrations.
Resetting is a destructive action and cannot be undone. All previously calculated metrics and incident history will be lost. Ensure that you no longer need this data before proceeding.
If you want to re-evaluate data without losing existing metrics and incident history, see Rerunning a Validator instead.
Common scenarios for resetting:
- Underlying data has changed — The source data was corrected or backfilled, and you need to re-validate against the updated records.
- Threshold sensitivity was adjusted — You updated a dynamic threshold and want to retrain the model on the full history with the new settings.
Deleting a Validator
You can delete a validator to permanently remove it and its associated data. Click the ⋮ menu and select Delete.
Managing Incidents
From the incidents list on the Validator details page (Metric tab), you can:
- Update the status of an incident during investigation or triage.
- View the debug information to troubleshoot the incident. For more information, see Debugging an Incident.
- Click View Group Details to open a more detailed incident group view for troubleshooting and root cause analysis. For more information, see Managing Incident Groups.
Updated 2 months ago